
Article: Guide to Home Game Room Layout Ideas
Guide to Home Game Room Layout Ideas
A great game room usually fails in one of two ways: it looks impressive but feels cramped, or it has plenty of space but never feels immersive. The difference is layout. This guide to home game room layout planning is built for people who want more than a random collection of gear - they want a room that plays better, looks sharper, and makes every square foot work harder.
A smart layout is what turns premium equipment into a premium experience. Whether you're building around a racing simulator, a full arcade lineup, a console lounge, or a mixed-use entertainment room, the goal is the same: create clear zones, protect flow, and match the room to how you actually play.
Start your home game room layout with the room itself
Before you choose furniture placement, start with the fixed realities. Measure the room wall to wall, note ceiling height, mark windows and doors, and pay attention to outlets. If your room has low ceilings, support columns, or a closet that swings wide, those details will shape the layout more than the gear wishlist will.
It also helps to decide what kind of room you're building. A dedicated gaming room can prioritize immersion and permanent setups. A flex room has to share space with guests, storage, or family use. That changes everything from seating depth to walking clearance.
One mistake people make is treating every room like a blank rectangle. Basements, bonus rooms, and converted garages often have awkward dimensions. Instead of fighting that, use it. Alcoves can become simulator corners. Narrow walls can hold arcade cabinets. A longer room can naturally support separate play and lounge zones.
Build the layout around a primary zone
The strongest game rooms have a clear anchor. In practical terms, that means one primary zone gets the best placement in the room, and everything else supports it.
If your main priority is console or PC gaming, the display wall usually becomes the anchor. Put that zone where glare is easiest to control and where seating can face the screen without blocking walkways. If the main event is a racing simulator or flight setup, give that station enough visual presence and enough clearance that it feels intentional, not squeezed in as an afterthought.
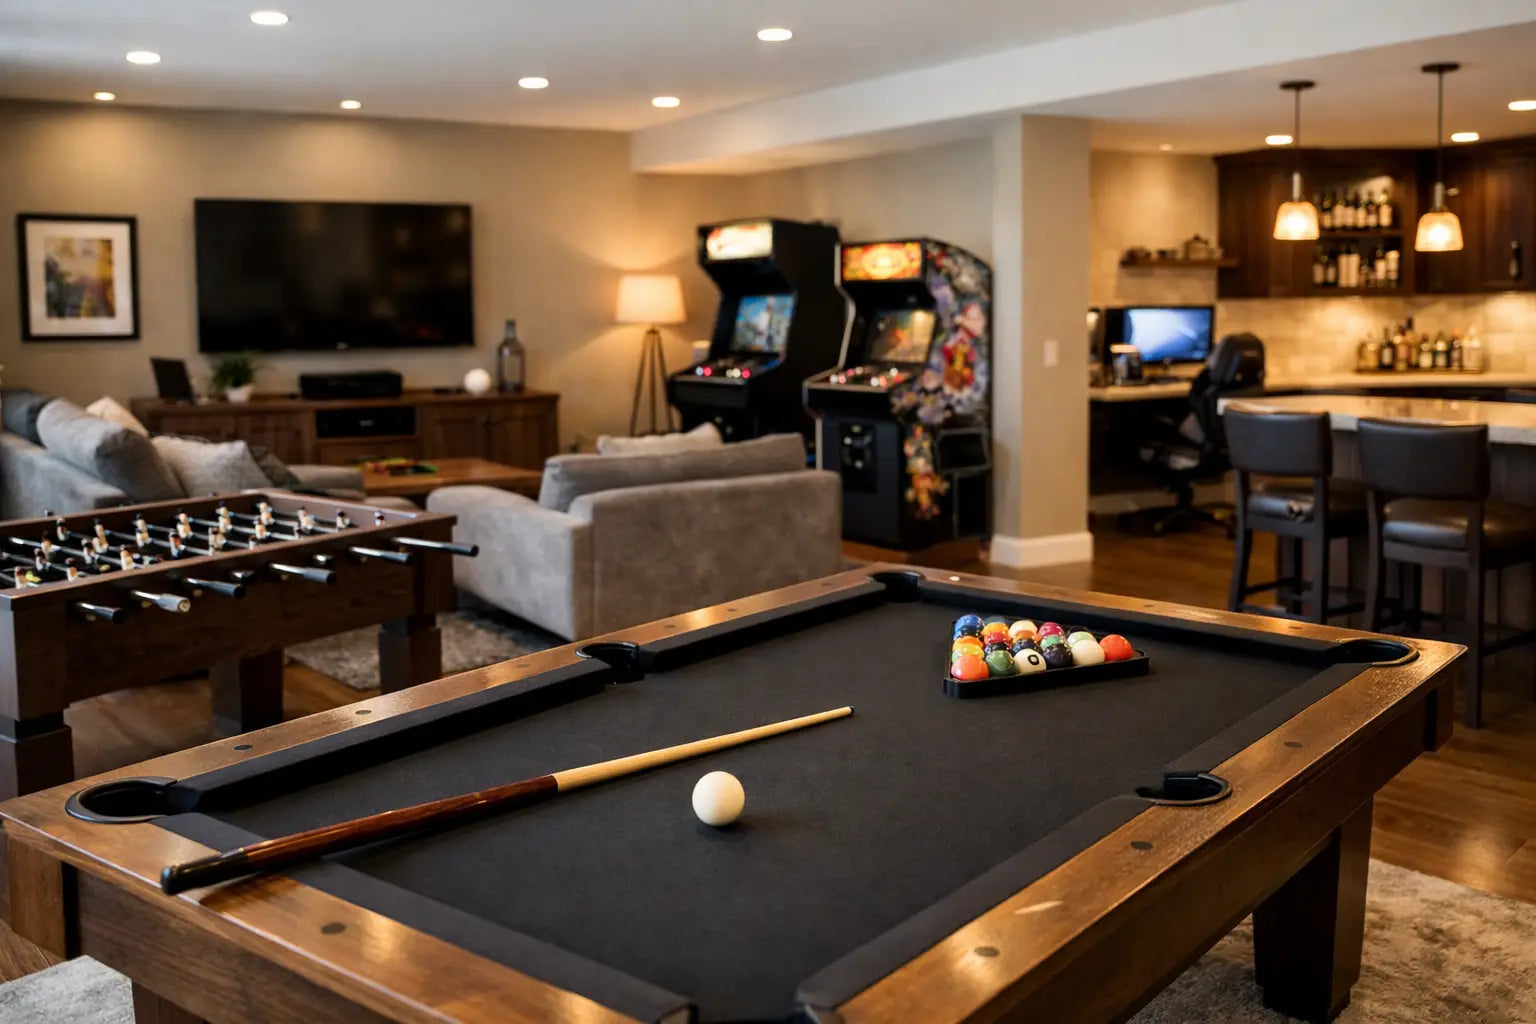
Arcade-focused rooms work a little differently. In that case, the anchor may be a row of upright cabinets or a centerpiece machine, with the rest of the room arranged to keep traffic moving around it. Game tables like pool, air hockey, and foosball demand even more discipline, because the table itself is only part of the footprint. You also need room for players to move, cue, swing, and step back comfortably.
This is where trade-offs matter. A room can support several experiences, but usually only one can be the hero. If you try to give every setup equal priority, the room starts to feel crowded and visually noisy.
Create zones that match how you play
The best guide to home game room layout design is not about stuffing in more gear. It's about separating experiences so the room feels organized and easier to use.
Most successful layouts fall into three functional zones: active play, seated immersion, and support space. Active play includes arcades, table games, VR, and simulator rigs where movement matters. Seated immersion covers TV gaming, PC stations, and reclined viewing areas. Support space includes storage, charging, snacks, décor, and all the little things that keep the room clean and ready.
These zones do not need walls between them, but they do need boundaries. A rug can define the lounge area. Lighting can separate the simulator bay from the rest of the room. Shelving or low cabinets can create a visual edge without making the room feel smaller.
If multiple people will use the room at once, zone planning becomes even more important. A solo gaming room can be tighter and more dramatic. A family or social game room needs wider paths, more flexible seating, and better sightlines so people can play, watch, and move around without colliding.
Leave more clearance than you think you need
This is where many layouts fall apart. People measure the size of the equipment but forget the space around it. A couch may technically fit, but if no one can walk behind it comfortably, the room will always feel off.
As a general rule, keep main walkways open and obvious. You want people to enter the room and instantly understand where to go. Avoid placing large furniture where it forces zigzag movement. A clean path from the door to the main seating area makes the room feel larger, even when it is fully outfitted.
For game tables and simulator rigs, clearance is part of performance. A racing seat pushed too close to a wall is harder to enter and exit. An arcade cabinet with no elbow room is less fun to use. A pool table in a room that is technically large enough but functionally tight becomes frustrating fast.
When in doubt, choose fewer pieces with better spacing. Premium rooms tend to feel elevated because they are edited well, not because they are packed edge to edge.
Plan sightlines, not just furniture placement
A layout should look good from the doorway, but it also has to work from every seat. Sightlines are what make a game room feel immersive instead of improvised.
For screen-based setups, place seating so viewers are centered on the display whenever possible. Off-angle viewing may be acceptable for overflow seating, but your primary seats should have a direct and comfortable line to the screen. If the room supports both gaming and watching, think about whether spectators can see the action without standing in the active zone.
Simulator and arcade setups have their own sightline needs. Sim rigs benefit from being placed where the screen or monitor array does not face bright windows. Arcades look incredible along a wall, but they should not create a wall of backs that blocks the room's energy. Angling one or two key pieces can help the layout feel more dynamic.
This is also a good time to think about camera placement if you stream or create content. A room that supports clean backgrounds and consistent lighting will do more for your setup than another accessory ever will.
Use lighting to shape the experience
Lighting is often treated like décor, but in a game room it is part of the layout. It changes how zones feel, how screens perform, and how premium the room appears once everything is powered on.
Start with layered lighting. You need enough general light to move around safely and clean the room, but you also want localized lighting for specific zones. Accent lighting behind displays, under shelving, or around arcade pieces helps define the space without blasting the whole room.
Avoid placing primary screens opposite uncovered windows if possible. Natural light can be great during the day, but glare ruins immersion. Blackout curtains or adjustable shades are worth planning early, especially in media-focused rooms.
Color also matters. Cooler accent lighting tends to feel more futuristic and performance-driven, while warmer tones can make lounge areas feel more inviting. If your room combines hard-edged tech and relaxed seating, a mix of both can work well.
Keep storage close to where clutter happens
Nothing makes a premium room feel cheaper faster than visible cable tangles, stacked accessories, and nowhere to put controllers. Storage should live near the activity it supports.
That means controllers, headsets, remotes, and chargers should sit near the main gaming zone. Simulator accessories should have a dedicated home nearby. Board games, cues, and small arcade tools should not be stored across the room if they are used constantly.
Closed storage keeps the room looking cleaner, while display shelving can highlight collectibles, retro hardware, or standout gear. The right mix depends on your style. If you like a polished showroom feel, hide more than you show. If you want the room to reflect your personality, make space for curated display moments instead of letting everything compete for attention.
Make your guide to home game room layout future-proof
A smart room works now and still has room to grow. That matters because game rooms rarely stay frozen. New gear shows up. Seating changes. A casual setup becomes a more serious hobby.
Leave expansion space where possible. Maybe that means one open wall for a future cabinet, extra outlet access for another display, or modular seating that can be reconfigured for parties and watch nights. If you're investing in enthusiast-grade equipment, planning for the next upgrade is simply part of getting the layout right.
This is also where quality earns its keep. Better furniture, stronger seating, and thoughtfully chosen equipment are easier to build around because they are designed to stay in the room longer. At Your Tech Haven, that future-ready mindset is exactly what makes a great setup feel worth the investment.
The best game room layout is not the one with the most equipment. It's the one that makes every session feel easier to start, better to experience, and harder to leave.
